The Best Yumblink Pancakes recipe you will fall in love with. Full of tips and tricks to help you make the best pancakes.

Hey foodies! It’s been a few months since I started making my own kimchi, and let me tell you, I’ve never looked back! It’s super easy to make and sooooo good. If you’ve never tried homemade kimchi, trust me, you’re missing out on something amazing. This recipe is a combo of @maangchi and @modernpepper’s, with a few tweaks to make it just right for my taste. Ready to get started? Let’s dive in!
Method
Salting the Cabbage
Start by cutting your napa cabbage in half, then rinse it lightly under water. Next, salt the cabbage generously, making sure to add extra salt at the base of the leaves. This will help the cabbage soften and release moisture as it sits. Place the salted cabbage in a large bowl, turning it over every 30 minutes to ensure even salting. Continue this for a total of 2 hours (or longer if your environment is warm). The cabbage should be soft and bendable by the end of the salting process. If you notice any pieces that snap when bent, allow them to salt a little longer until they become pliable.
Washing the Cabbage
Once the cabbage has softened, rinse it under running water several times to remove any excess salt. It’s important to taste a piece to check if it’s still too salty. If it is, wash it a few more times to ensure the cabbage isn’t overly salty, as this could affect the flavor of your kimchi.
Making the Rice Porridge
To make the rice porridge, combine water and glutinous rice flour in a medium pot. Set the pot over medium heat, stirring continuously until the mixture starts to bubble. Once bubbling, add sugar and continue cooking for another minute until the mixture thickens slightly into a runny consistency. Remove the pot from heat and pour the rice porridge into a bowl. Allow it to cool before using it in the next step.
Preparing the Paste
In a blender or food processor, combine the garlic cloves, onion, ginger, and pear. Blend everything until it forms a smooth paste. This paste will serve as the flavorful base of your kimchi, so be sure to blend it well to achieve a consistent texture.
Mixing the Kimchi Paste
Now, take a large mixing bowl and combine the cooled rice porridge with the blended paste. Add the fish sauce, fermented shrimp, dashida, and gochugaru (Korean red pepper flakes) to the mixture. Stir everything together thoroughly until the paste is evenly mixed. The mixture should have a thick, slightly runny texture, and it will have a vibrant red color from the gochugaru.
Incorporating the Vegetables
Next, add the sliced spring onions, mooli (daikon), and carrot to the paste. Gently stir the vegetables into the paste, making sure they’re evenly coated. These vegetables not only enhance the flavor of your kimchi but also add a nice crunch and texture once the fermentation is complete.
Applying the Paste to the Cabbage
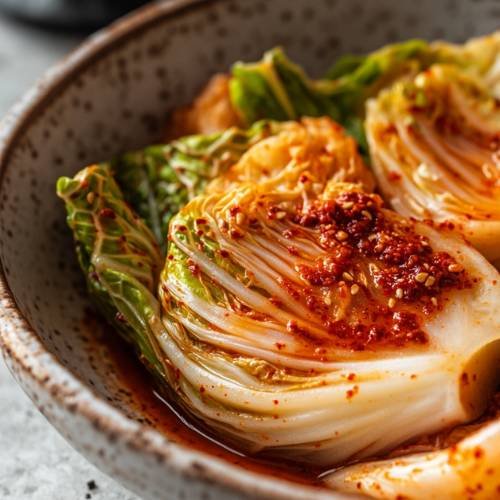
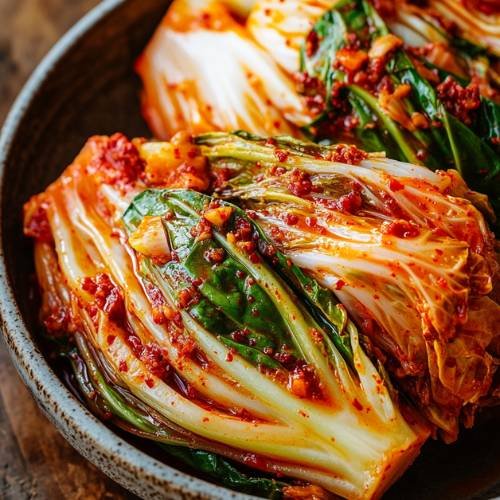
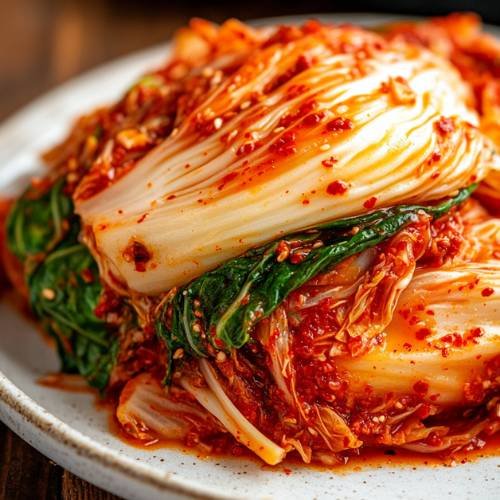
Wearing gloves (to avoid the red pepper flakes from staining your hands), take a handful of the paste and begin spreading it in between the leaves of the cabbage. Work the paste into the cabbage as evenly as possible, making sure to cover each leaf thoroughly. Once the cabbage is fully coated, you can fold the cabbage into a small ball to fit it neatly into your jars or containers. Press it down gently to ensure it’s compact.
Fermenting the Kimchi
Once your kimchi is packed into the containers, let it ferment at room temperature for 2-3 days. Press down on the kimchi once a day to release air bubbles. You’ll know it’s ready when you start to see bubbles form at the top when you press down. It’s important to keep the cabbage leaves submerged in the kimchi liquid during fermentation, as this helps preserve the flavor and prevents spoilage.
Storing the Kimchi
Once your kimchi has fermented to your liking (for a more sour taste, let it ferment longer), transfer it to the fridge for storage. It will continue to ferment at a slower rate in the fridge and can last for up to 3-6 months. Be sure to always keep the kimchi submerged in its liquid to maintain its flavor and quality. Enjoy your homemade kimchi with meals or as a tasty snack!
Necessary Tools
- A large bowl (for salting cabbage)
- A blender or food processor (for the paste)
- A pot (for making rice porridge)
- Gloves (for mixing the paste into the cabbage)
- Jars or containers (for storing the kimchi while it ferments)
Homemade Kimchi
Cuisine: KoreanDifficulty: EasyServings
3
servingsPrep time
30
minutesCooking timeminutes
Total time
30
minutesIngredients
1.5kg Chinese leaf (napa cabbage)
1/4 cup salt
1 cup water
1 tbsp glutinous rice flour
1 tbsp sugar
10 garlic cloves
1 inch ginger
1/4 onion
1/4 pear (Asian pear best, but Bosc pear works)
1 cup gochugaru (Korean red pepper flakes)
1/4 cup anchovy sauce (or fish sauce)
1 tbsp saeujeot (fermented shrimp)
1 tsp dashida (Korean soup stock)
6 spring onions, cut into chunks or slices
228g mooli/daikon (about 1 cup), sliced thinly
1 large carrot, sliced thinly
Directions
- Cut the cabbage in half and wet it. Salt it generously, making sure to add more salt at the base. This will help it soften and release moisture.
- Place the cabbage in a large bowl, turning it over every 30 minutes for a total of 2 hours. If your environment is warmer, you may need to salt it for a bit longer.
- After 2 hours, check the cabbage. It should be soft and bendable. If it snaps when you bend it, let it salt a bit longer.
- Wash the cabbage under running water a few times to remove excess salt. Taste a piece if it’s still salty, rinse it a little more.
- For the rice porridge In a pot over medium heat, combine water and glutinous rice flour. Stir until it starts to bubble. Then, add sugar and cook for another minute until it’s combined and has a runny consistency. Pour into a bowl and set aside to cool.
- For the paste In a blender, combine garlic, onion, pear, and ginger. Blend until it forms a smooth paste.
- In a large bowl, combine the rice porridge, paste, fish sauce, fermented shrimp, dashida, and gochugaru. Mix well.
- Add the sliced spring onions, mooli, and carrot to the mixture and stir to combine.
- Wearing gloves, carefully spread the paste between all the cabbage leaves. Once coated, place the cabbage into jars or containers, folding it into small balls to fit better.
- Let the kimchi ferment for 2-3 days or until you see bubbles when you press down on it. Ensure the cabbage leaves stay submerged in the liquid to preserve the flavor. Once it’s fermented, pop it into the fridge where it will keep for 3-6 months. If you prefer it more sour, let it ferment longer.
Notes
- When salting the cabbage, make sure to coat it evenly and let it rest long enough to soften. If it’s not soft enough, it will be harder to fold the paste into the leaves.
- Be careful not to over-salt the cabbage in the first step! If it’s too salty, rinse thoroughly before mixing in the paste.
- Wear gloves when mixing the paste into the cabbage. The gochugaru (red pepper flakes) can leave a stain on your hands, and you don’t want to accidentally rub your eyes afterwards!


Serving Suggestions
- Serve your kimchi with a bowl of steamed rice or as a side dish to your favorite Korean meals like bulgogi or bibimbap.
- Try adding it to soups, stir-fries, or even tacos for a spicy, tangy twist!
- If you’re feeling adventurous, add a spoonful of kimchi to your ramen or sandwiches for an extra punch of flavor.
Fun Fact
Did you know that kimchi is one of the healthiest foods you can eat? It’s packed with probiotics, which are great for your gut health. Plus, it’s low in calories and high in fiber talk about a win-win!
Conclusion
Making homemade kimchi is so rewarding and super easy to do once you get the hang of it. Whether you’re a seasoned kimchi maker or trying it for the first time, this recipe is sure to impress. It’s bursting with flavor, and it’s a fun way to experiment with Korean cuisine. Plus, once it’s ready, you’ll have a delicious and healthy snack or side dish on hand for weeks to come. Happy fermenting!